Live ID verification
Schedule, run, record, and replay browser-based live video verification sessions in Certivant — no app download required for applicants.
What it does
Some verifications can't be done by document upload alone — the applicant might be high-risk, the document might be unusual, the regulator might require a face-to-face. Live ID verification is a built-in live video flow: you (or a designated reviewer) join a one-time live ID verification session with the applicant, ask them to show their ID, confirm liveness in real time, and record the whole thing as evidence.
The session is browser-based — no app downloads, no third-party meeting room. The recording lands in the applicant's verification request as standard evidence.
When to use it
- High-risk applicants where the auto-checks aren't enough.
- Compliance escalations where a senior reviewer wants to see the person live.
- Regulator requirements that mandate face-to-face onboarding (some banking, securities, gambling, healthcare regimes).
- Unusual documents the OCR pipeline struggles with — you can ask the applicant to position the ID for the camera.
Where it lives
Two entry points:
- From the KYC list — the kebab menu on each row has Schedule a Live ID and Start Live ID now.
- From the detail page — the action bar at the top has the same options.
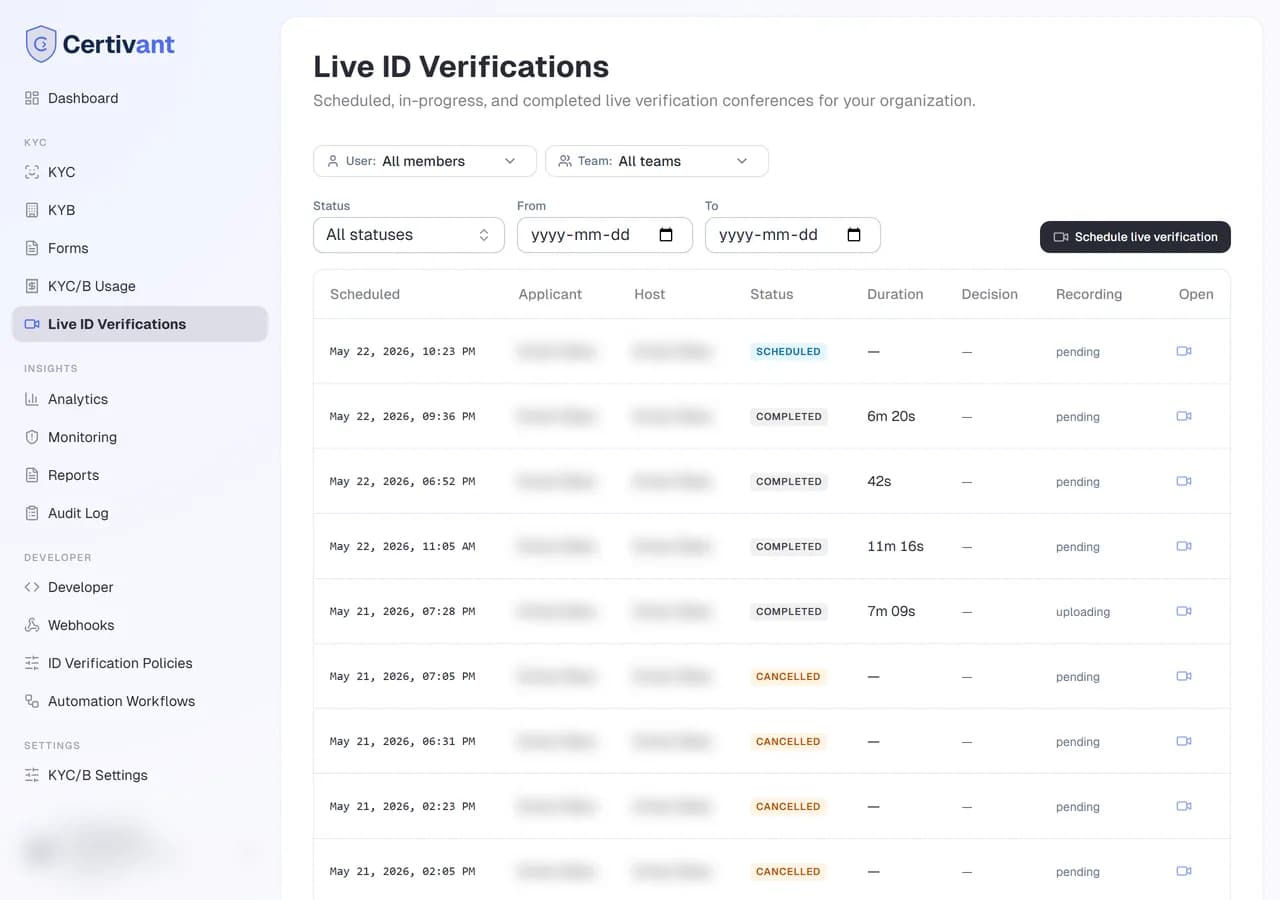
There's also a top-level Live ID Verifications entry in the sidebar that lists all scheduled and past sessions.
Schedule a session
Click Schedule a Live ID on the applicant's request
A dialog opens.
Pick a time + duration
Slot length defaults to 30 minutes; adjust if you need shorter or longer. You can pick "Right now" for ASAP.
Pick the host
By default, you. Or assign another org member with the right permission. The host runs the session.
(Optional) Add co-hosts and observers
- Co-hosts — other org members who join the session with full controls (can ask questions, see the same evidence).
- Observers — silent attendees (compliance officer watching live, legal counsel). They see and hear but the applicant isn't told they're there. Useful for four-eyes review.
Co-hosts and observers must be members of your organization. To invite someone from outside — an external auditor, a notary, a translator — you need the Invite guests permission (Settings → Teams & Roles → Roles & Permissions, under Live ID verification; owners and admins always have it). You can also invite people during the call, from the session room's Invite button.
When you pick Guest (outside the organization), enter their full name and email, and optionally their mobile (international format, e.g. +1 514 555 1234) to also send the invitation by SMS. The guest joins with a personal link — no account needed — after acknowledging that the session is recorded:
- a guest co-host can talk and be seen, but has no host controls (documents, decisions, recording, ending the call);
- a guest observer watches and listens, without camera or microphone.
Guests carry a Guest badge in the session. A reminder sends them a new personal link and the previous one stops working.
Confirm
The applicant receives an email with the session details and a one-time join link. The host gets an email too. The session appears in your Live ID Verifications list.
Start a session now
For when you need to do it immediately:
Click Start Live ID now on the applicant's request.
Pick the channel for the join-link delivery — Email, SMS, or Copy link (you share it out-of-band, e.g., into an existing chat).
The applicant gets the link instantly. As soon as they click and join, you're in the session.
During the session
The session room has:
- Video grid — applicant in the centre, you and co-hosts in side tiles.
- Document carousel — every document the applicant has uploaded for this request, large and zoomable. Lets you compare the on-camera face to the ID photo.
- Notes panel — type notes during the session. Auto-saves; appears in the request's audit log after the session.
- Recording indicator — recording is on by default. Both you and the applicant see a red dot — required for regulator-compliance in most jurisdictions.
- Mute / camera toggle — for you. The applicant has their own controls.
- End session — ends the live ID verification for everyone. Auto-prompts for a quick Decision: Approve / Reject / Escalate so you decide while it's fresh.
Recordings are on by default because most jurisdictions require them. Don't disable unless you've checked with compliance. If you do disable, the audit log records that the session was recorded-off and why (you'll be prompted for a reason).
Documents photographed live, in front of you
When the applicant photographs a document during the session, in the session itself or in a form you shared, you watch it happen live:
- Phones that can use both cameras (most Android phones): you keep seeing the applicant's face, with their back camera shown live as a large inset. You see the person and the physical document at the same moment.
- iPhones and phones that use one camera at a time: the session switches to the applicant's back camera while they take the photo, then back to their face.
The applicant's tile shows a red Live document camera badge while this is happening. When they press the shutter, your browser saves a witness frame: the image you actually received at that moment. It's stored with the session's documents as Live witness frame, and the applicant can't alter it. The photo the applicant sends is marked Witnessed live in its details.
This defeats the usual tricks: a screenshot, a photo of a screen, or a picture of someone else's ID sent over. The applicant has to hold the real document in front of their camera while you watch.
Without the face check
By default the Face check (the biometric identity fraud check) is required in live ID verifications. The consent window lists it as a purpose, and the applicant must tick it to join. If you turned the full consent screen off when you scheduled the call, the Face check is not shown at all and only video recording is asked.
Applicants can decline the Face check only when the non-biometric alternative is on. Turn it on only where the law requires one, for example in Québec. It is set, first match wins, by faceCheckSkippable in the scheduling API when it is sent (true or false), then by the Let applicants skip the face check switch of the request's form, then by the organization setting in Verification settings (off by default).
With the alternative on, the Face check is shown as optional. If the applicant refuses it when they join, the call is not blocked and not cancelled: that live session is the non-biometric alternative, and you verify the ID by looking at it. (Recording consent is a separate question and is still always required.) Here is what changes:
- A notice for the host. The session shows Face check refused — compare the face visually. Compare the person's face with their ID on camera yourself.
- Only the selfie is turned off. Keeping a picture of an ID document for a person to look at isn't biometric; only capturing the face for automatic comparison is. So the applicant can still send ID documents (passport, driver's licence, ID card, residence permit and so on) and any other documents. The selfie is the one thing they can't send, and the server refuses it, not only the screen.
- Document requests. Request a document offers every type except Selfie, and the form picker hides only the forms that capture a face (a selfie or a face / liveness check). Forms that ask for pictures of an ID are still offered.
- No automated face matching. Nothing compares faces on the session's pictures, and the AI document review never compares faces either.
- No fraud-index entry. The applicant's face is not added to the face-fingerprint fraud index.
The answer is kept as evidence: the purposes, the wording version (2026-10-26), the time, and the applicant's IP address and browser. The v1 conference API returns it as consent.biometricConsent: true, false, or null when the Face check was not asked (consent screen off) or the answer was given earlier.
In public forms and on the hosted verification page the Face check is required by default too, and becomes optional the same way (the form switch or faceCheckSkippable in the API). There, an applicant who refuses skips the selfie and the face and liveness checks, and the request goes to manual review with the reason Face check refused — verify in a live call, so you can schedule a live ID verification. See Consent.
After the session
The session moves to Completed status:
- Recording is encoded and stored in your configured storage (see your white-label settings and the super-admin's storage configuration).
- A transcript is auto-generated and attached to the audit log (text-searchable).
- The decision you made during the End-session prompt is applied to the verification request.
- Notes you typed during the session become part of the applicant's permanent record.
You can re-watch the recording from the request's Conferences tab. The viewer has chapter markers at each document-discussed moment so you can jump to a specific ID review.
Automate it with policies and workflows
Live ID verification is wired into both automation tools:
- Your decision policy can ask for a call. A rule with the Require live verification outcome escalates the request and shows a Live ID verification required banner on it — see Require live verification. After the call, a re-verification lets the policy read the result (
liveVerification.hostDecision,liveVerification.applicantAttended…). - Workflows can book and cancel calls. The Schedule a live ID verification action books the call (with a chosen host and delay) and invites the applicant; Cancel the live ID verification cancels a scheduled one. See Live ID verification actions.
- Every step of the call is a workflow trigger — scheduled, rescheduled, started, ended, completed, cancelled, abandoned, recording consent refused, host transferred, participant invited, participant absent, recording ready or failed, document reviewed, and media-integrity warnings. A workflow can also wait until the call starts or ends.
- The decision you record in the call approves or rejects the request and fires the usual approved / rejected events, marked
source = "live_verification"so a workflow can tell it from a reviewer's decision.
For example: policy rule VPN detected → Require live verification, then a workflow Live verification required → Schedule a live ID verification (in 24 h) → Wait until the call ends → if the applicant didn't attend, email them a new link.
Reschedule / cancel
From the Live ID Verifications list page or from the applicant's request:
- Reschedule — pick a new time. The applicant gets a new email with the updated details.
- Cancel — kills the session. The applicant's join-link stops working. Recommended to add a cancel note explaining why (logged for compliance).
No-show handling
If the applicant doesn't join within 10 minutes of the scheduled start:
- You can Wait (extend the wait window).
- Reschedule (one-click into the reschedule dialog).
- Mark as no-show (records the event in the audit log; applicant's request status doesn't change).
Troubleshooting
Applicant can't connect
The applicant needs a modern browser (Chrome 100+, Safari 15+, Firefox 100+) with camera + microphone permissions. They should test by clicking the link well before the scheduled time — the link works any time after delivery.
Audio is bad
This is the most common issue during a live ID verification session. Ask the applicant to use headphones, move closer to the router, and close other tabs. Live ID uses adaptive bitrate, so quality recovers within ~30 seconds of a network bump.
Recording missing after the session
Encoding takes a few minutes (long sessions might take longer). If the recording is still missing 30 minutes after the session ended, contact your super admin — they can re-trigger encoding from the request's Conferences tab → Re-process.
"Live ID feature not available on your plan"
Live ID is included on Pro and above. On Launch and Scale, it's an add-on. See Billing & credits or talk to your account owner.
Related
- KYC list & detail — the home of every applicant.
- Audit log — every live ID verification action is logged.
- Send a verification request — the typical first step before Live ID escalation.
- Design a risk policy — require a live call from a decision rule.
- Automation workflows — book, cancel and react to live calls automatically.
Data retention & deletion
How long Certivant keeps ID documents, how to delete documents permanently, and how to handle a person's request to delete their data — with the default form, the dashboard queue, the API and the audit trail.
Webhooks
Receive real-time Certivant events in your own systems when verifications change status — setup, HMAC signature verification, retry schedule, and full event-type reference.