Review KYC and KYB Verification Requests
Browse the Certivant KYC and KYB request list, use filters and bulk actions, and approve, reject, escalate, or override automated verification decisions from the detail screen.
What it does
The KYC and KYB pages are the heart of day-to-day work in Certivant. They show every verification request, with filters, stats, and bulk actions. Clicking into a request opens the detail screen — the documents the applicant uploaded, the automated checks that ran, the risk score, the audit trail, and the buttons to approve, reject, or escalate.
KYC and KYB share the exact same shell — switch between them in the left sidebar.
Before you start
- The list is scoped to your data-isolation rules. Owners and admins see everything. Members see only requests they own (where they're the primary manager) or where they've been added as a secondary manager. Team users see their team's requests if the team's visibility mode is "team-shared."
- For analytics across requests, use the dedicated Analytics page.
The list page
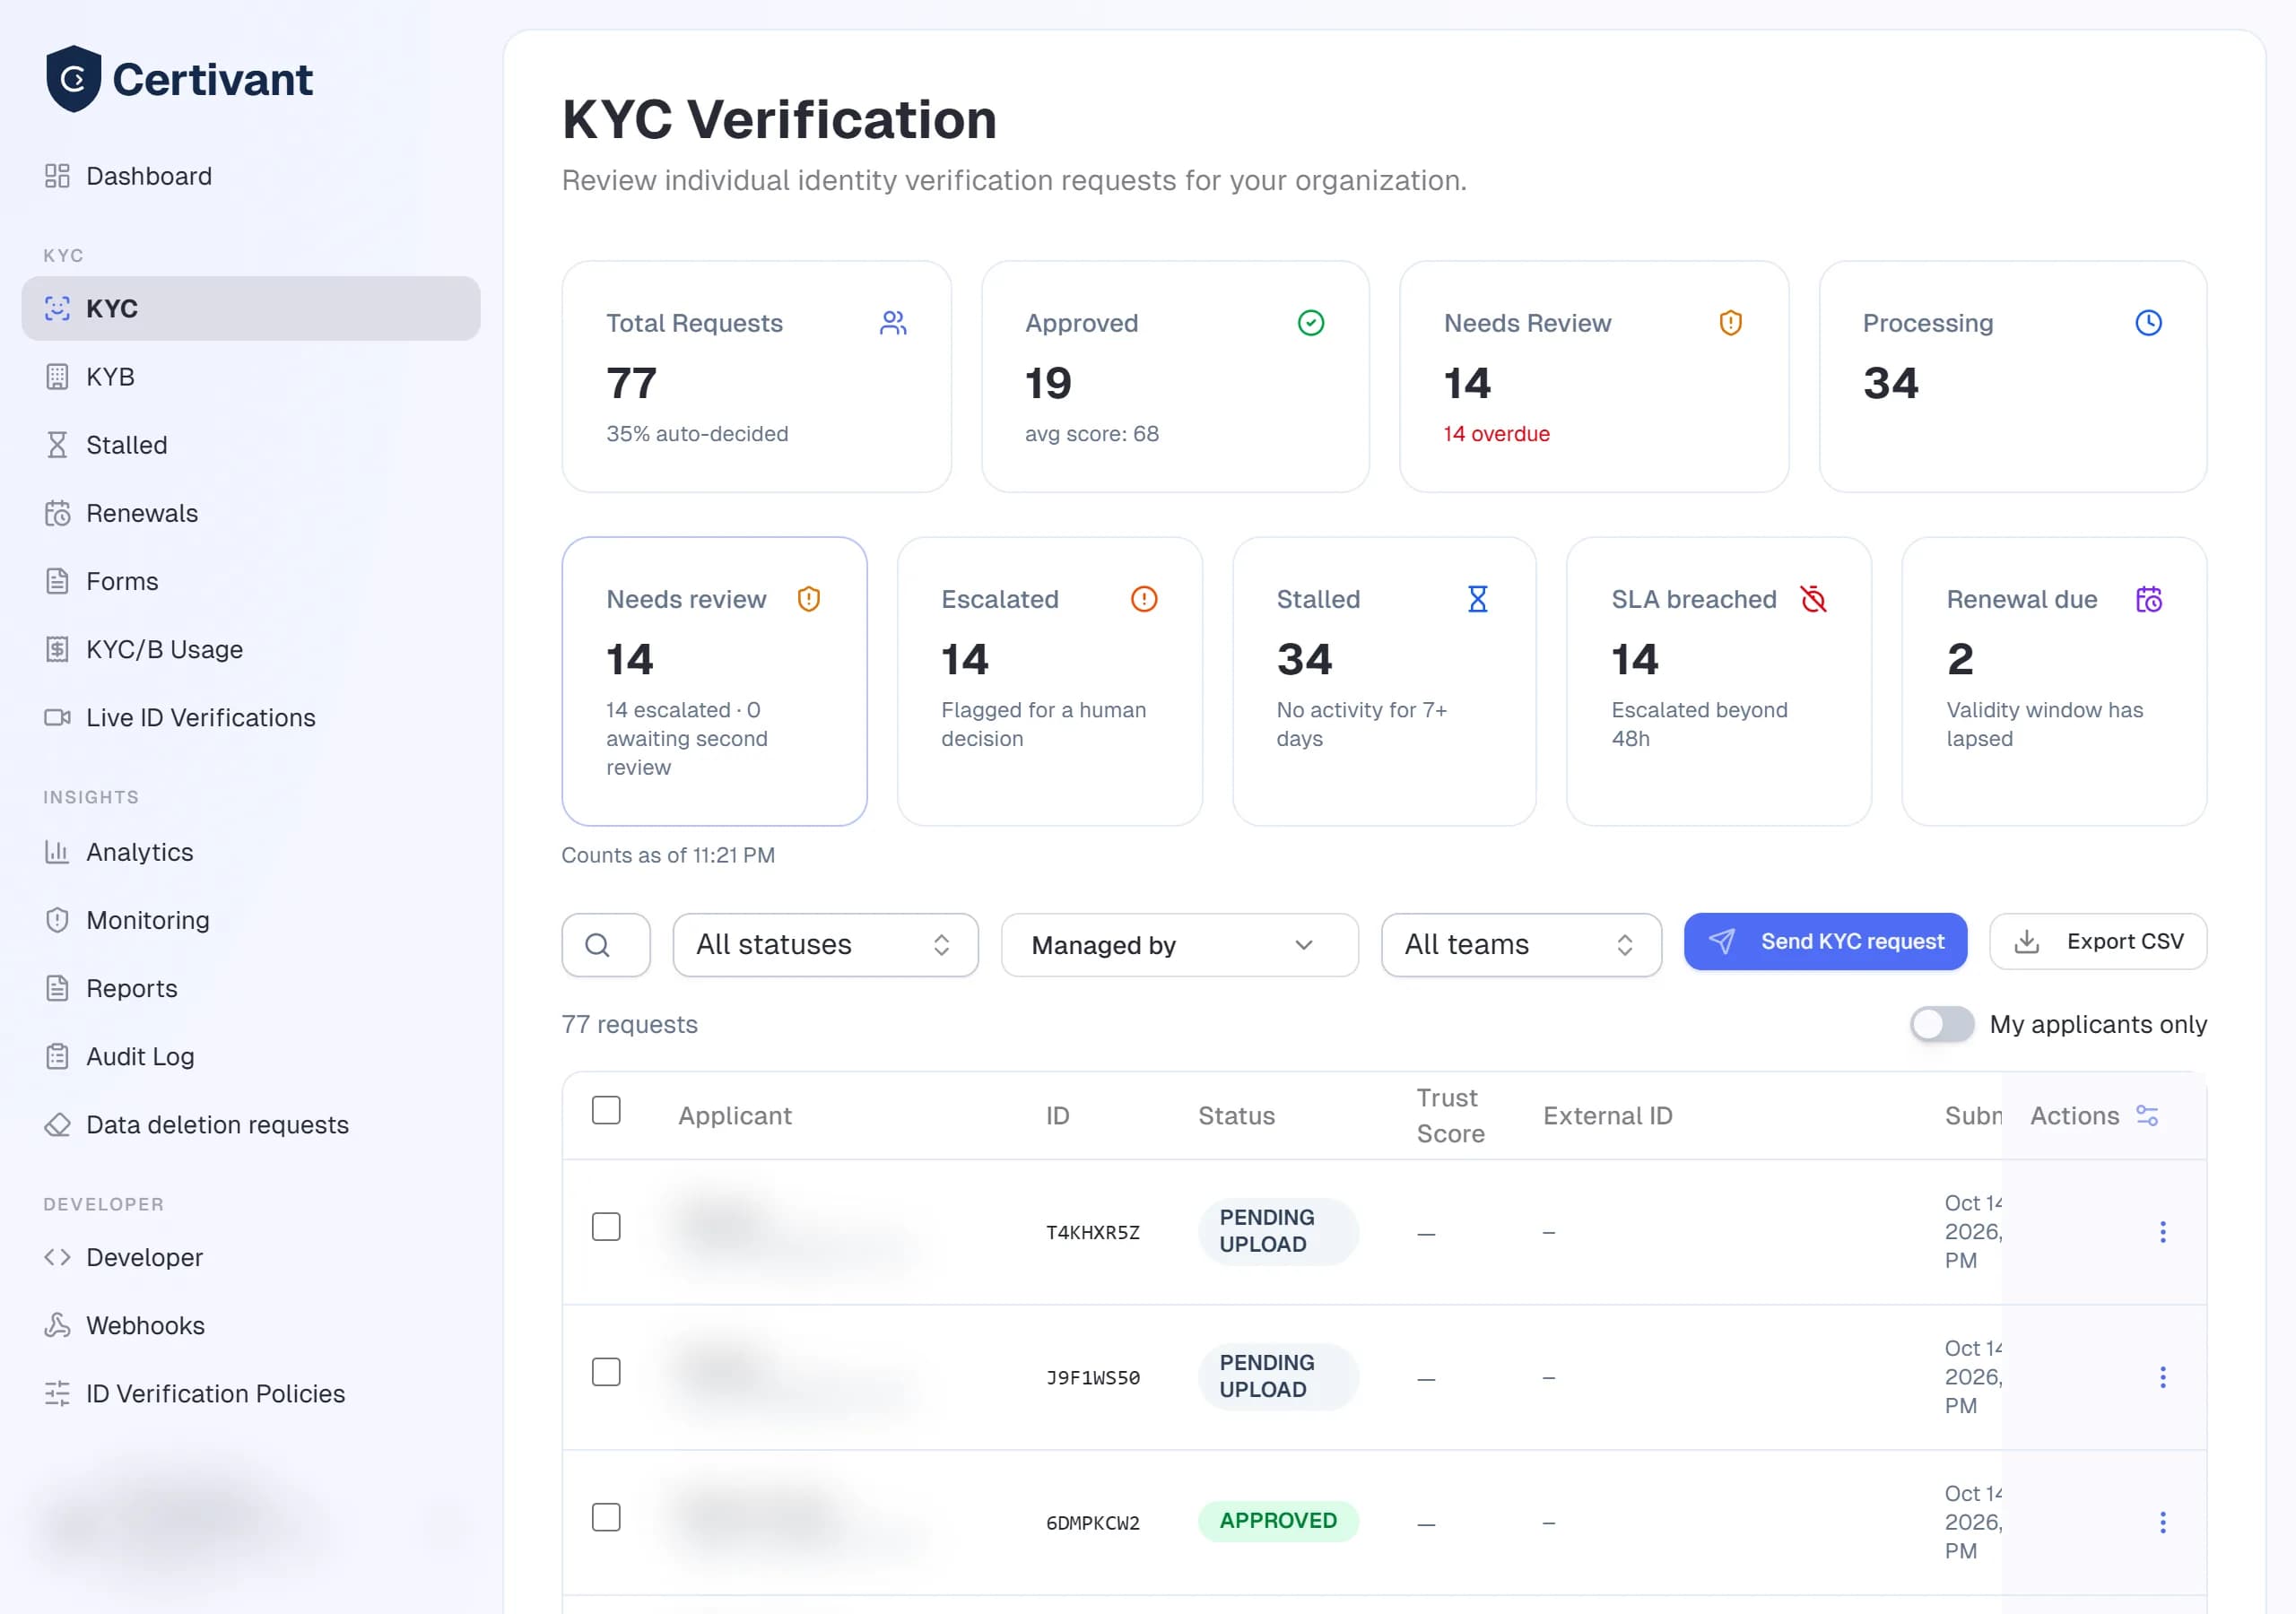
Stats cards
The top of the page shows four cards: Total requests, Approved, Needs review, Processing. They reflect the currently filtered set, so applying a status filter updates the counts.
Filters
| Filter | What it does |
|---|---|
| Search | Matches applicant name, email, or external reference. Case-insensitive. |
| All statuses | Filter to a single status — Pending Upload, Docs Ready, Processing, Needs Review, Approved, Rejected, Cancelled, or "Overdue Reviews." |
| Managed by | Owner/admin only. Filter to requests managed by a specific user or team. |
| Date range | Pick a from/to window. Empty = show all time. |
Optional columns (partner / sub-tenant)
If you integrate as a partner and tag requests with a sub-tenant (see Developer — API keys), the list can show two extra columns — Sub-tenant and External ID — that identify which of your end customers each request belongs to. They're hidden by default; turn them on from the column menu at the top-right of the table. The free-text Search box also matches on these values.
Document expired column
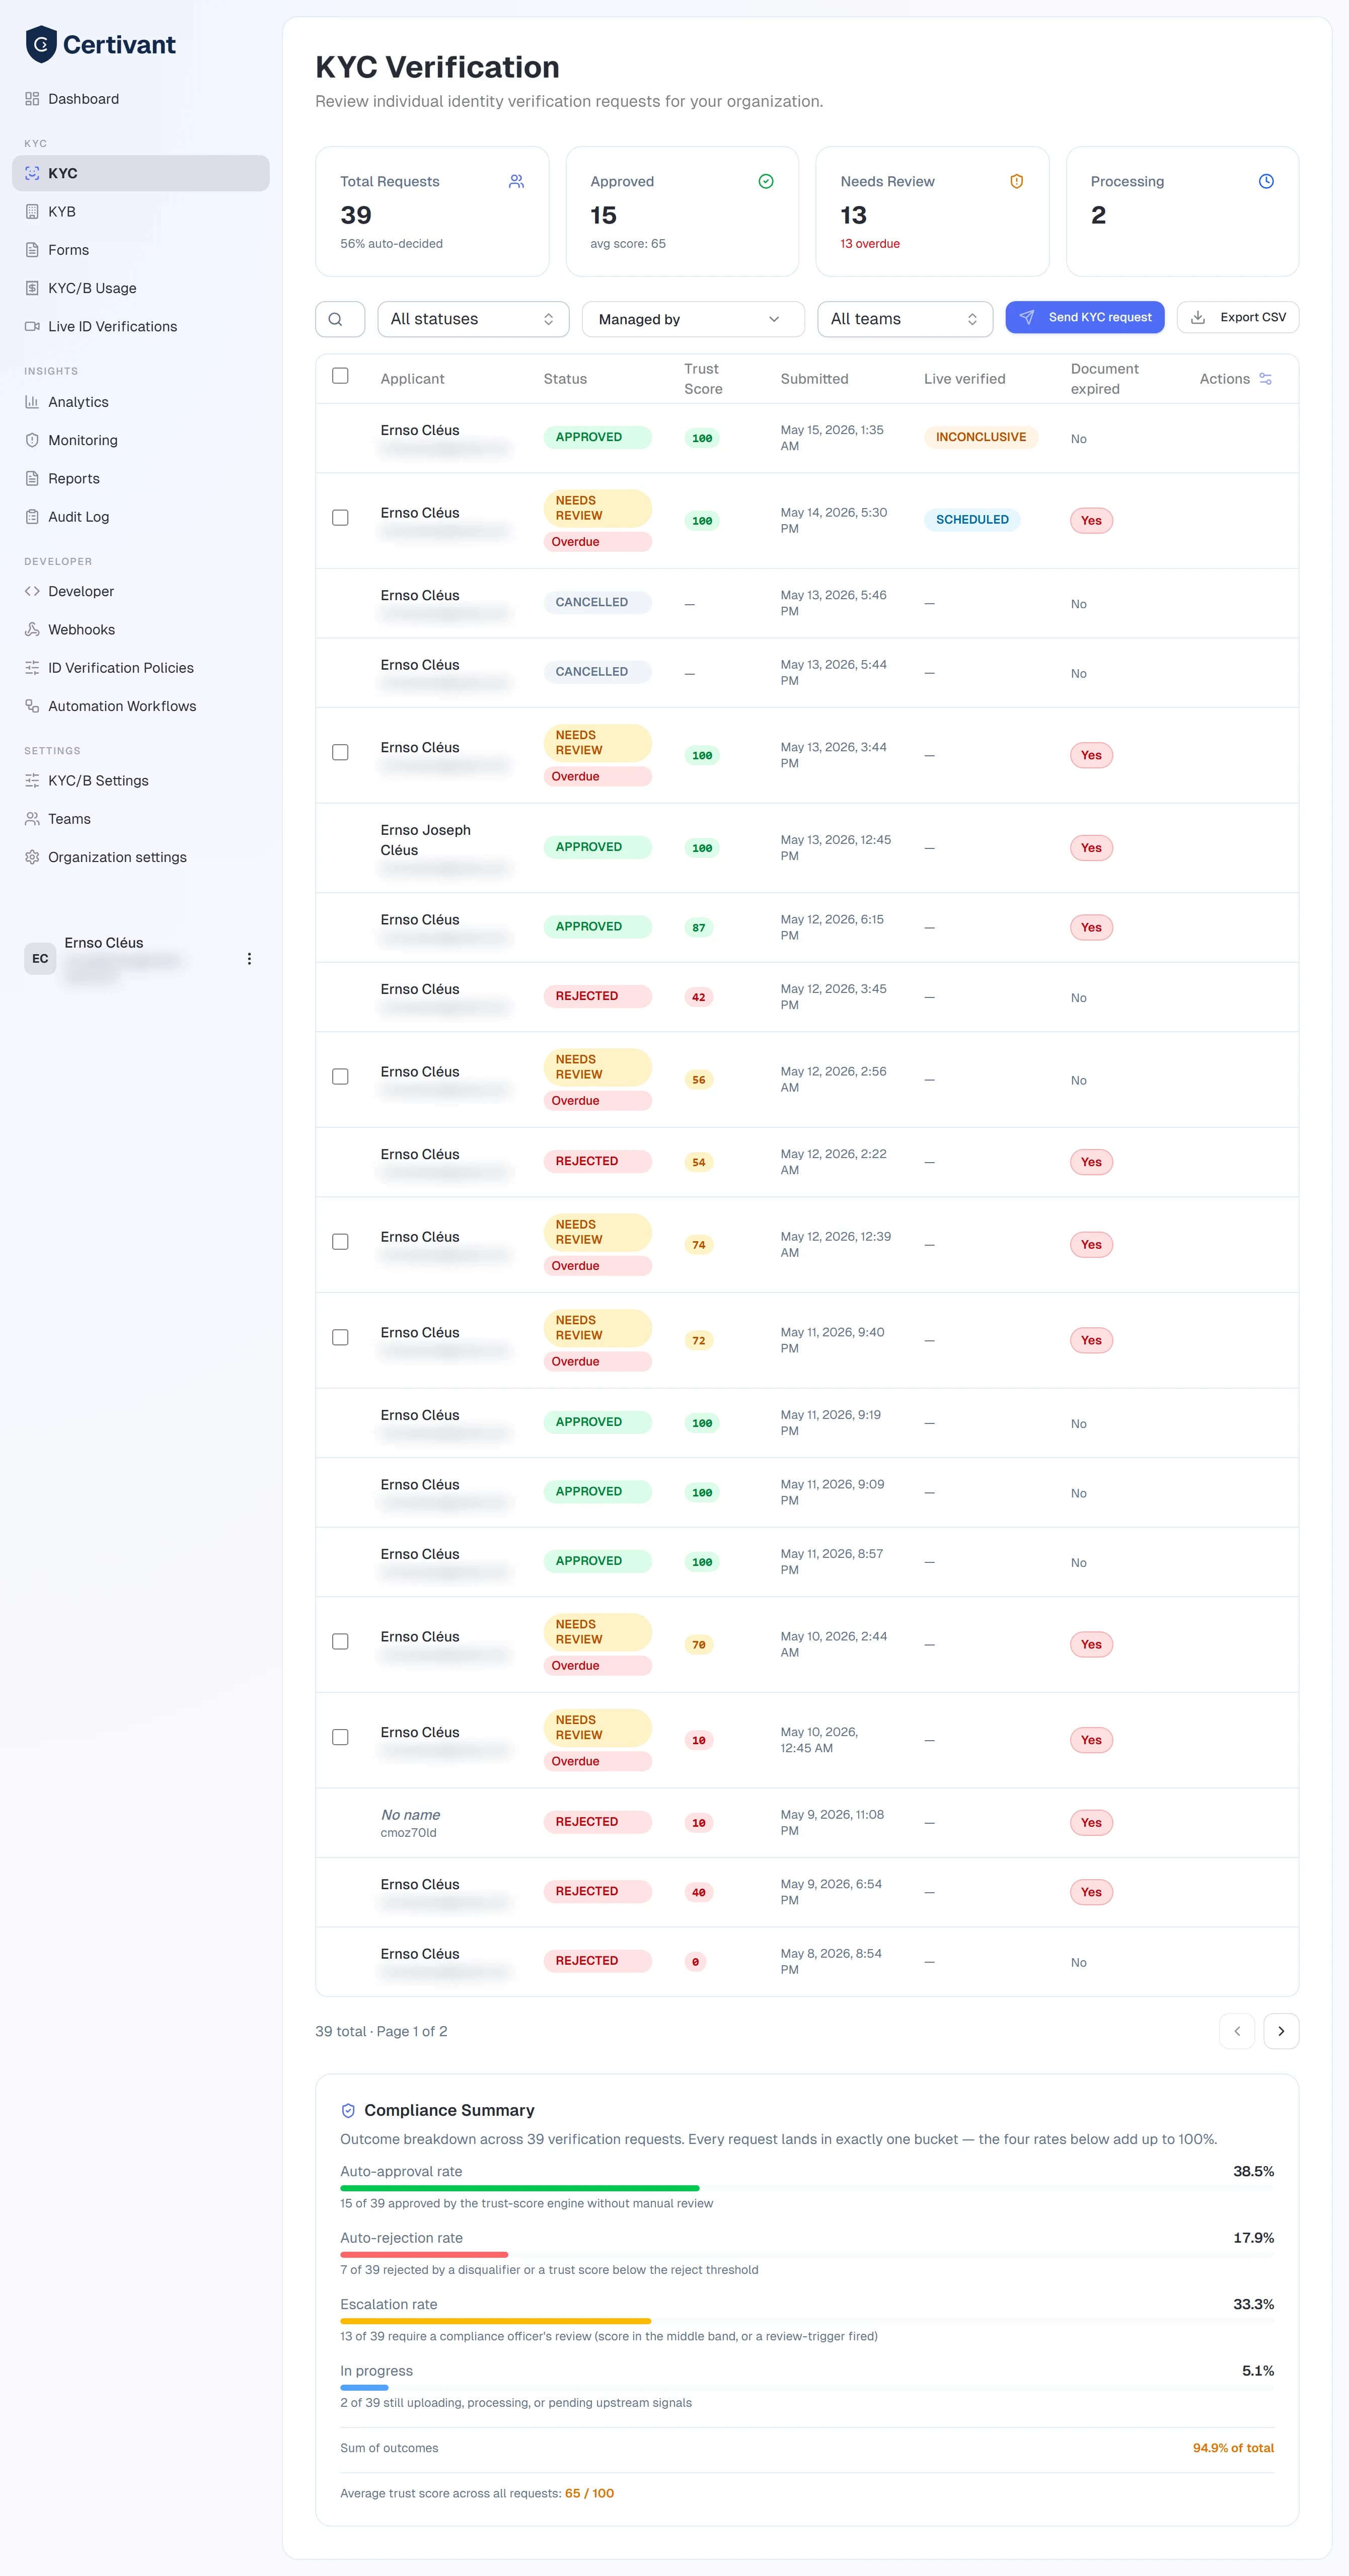
The Document expired column shows Yes (red) when any active document on the request is past its expiry date or older than your accepted recency window, and No otherwise. It's computed regardless of how your verification settings handle out-of-date documents — so even if you auto-accept them, the flag still surfaces here.
Bulk actions
Select multiple rows with the checkboxes on the left. The bulk action bar appears with Approve and Reject buttons. You'll be asked to enter a review note that's recorded on every selected request's audit log.
Bulk decisions can't be undone via the UI. Use them only when you've reviewed each request — for example, after spot-checking a batch of low-risk auto-approvals.
Per-row actions
Each row has a kebab menu (three vertical dots on the right). Common items:
- Open — go to the detail page.
- Schedule a Live ID-verification — invite the applicant to a live video session with an examiner.
- Start Live ID now — same, but immediate (sends them a one-time link).
- Reassign — change who manages this applicant (owner/admin only).
- Manage managers — add or remove secondary managers.
- Export — download the request data as JSON or a ZIP of all documents.
- Resend invitation — for requests still in
PENDING_UPLOAD.
The detail page
Click an applicant to open the detail screen. It has four main areas.
Everything on this screen is also available over the API. If you
embed Certivant in your own product, a single
GET /api/v1/kyc/requests/:id
returns the applicant data, the documents (with their extracted fields),
every check, and the full risk breakdown, and
GET …/documents/:docId/url
returns a signed, viewable URL for each ID image — so your team can review
and decide without logging in to Certivant.
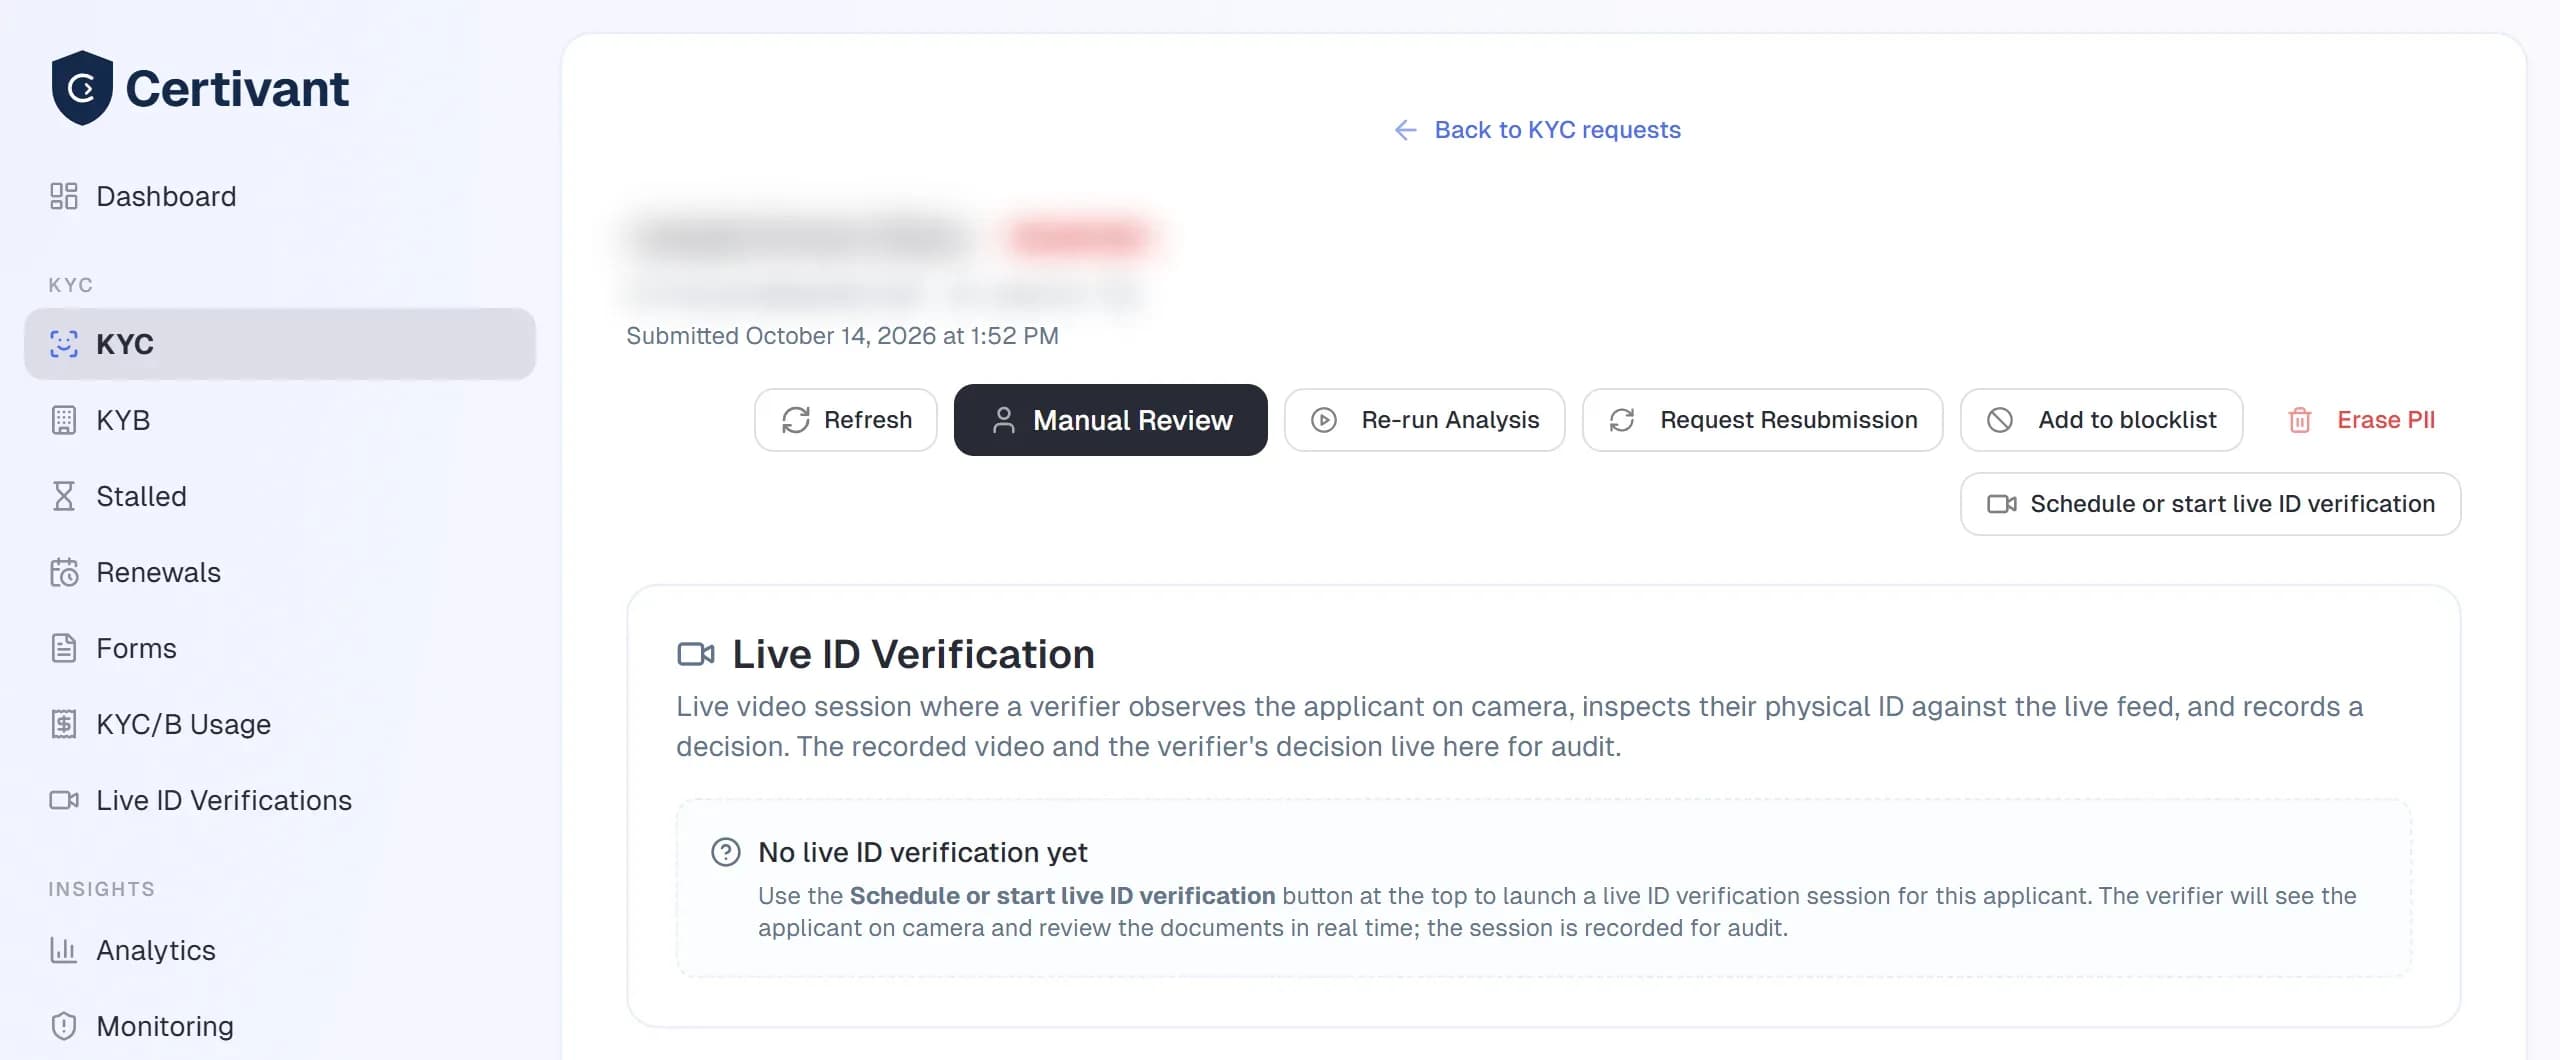
Applicant header
Name, email, phone, status badge, and a row of action buttons:
- Approve / Reject — manual decision, recorded with your review note.
- Escalate — flag for a senior reviewer (puts the request in
ESCALATEDstatus). - Reassign — change the primary or secondary managers.
- Add to blocklist — block this applicant's face, document number, email, phone, IP address or device for future verifications. See Blocklist and duplicate detection.
- Kebab menu for the less-common actions.
Documents tab
Every file the applicant uploaded, grouped by document type (ID, selfie, business registration, etc.). Click any document to:
- View it inline.
- Download the original.
- Re-run OCR / re-analyse it (if the first pass was poor quality).
- Request a resubmission — sends the applicant a one-time link to re-upload that specific document.
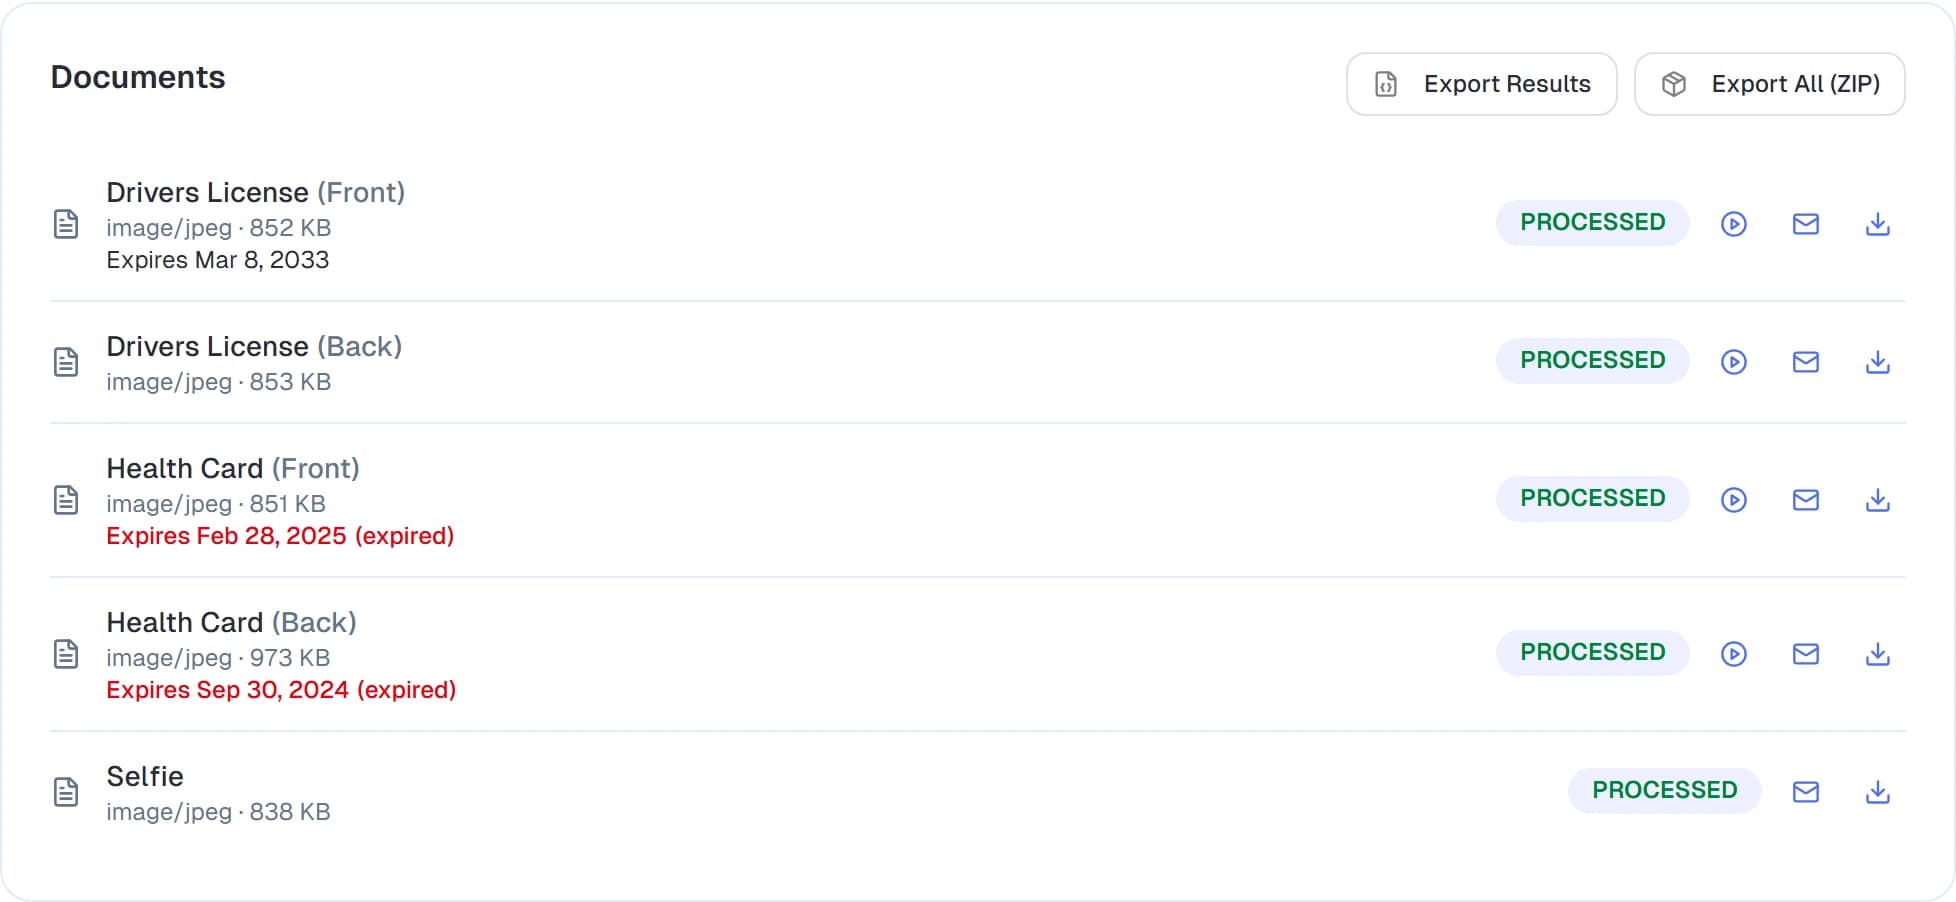
Each document also shows its expiry date (identity documents) or issue date (statements and bills), rendered red when the document is expired or older than your accepted window. When the system couldn't read a document's date, a blue "For your information" notice appears at the top of the request asking a reviewer to confirm the date manually — the document is still accepted. Configure these rules under verification settings.
Checks tab
Once a verification has been scored, the Trust Assessment card at the top lists every scored factor and shows which ones forced a review (a "Tier 2 review trigger — forces ESCALATE" line appears when a review trigger fired) and the final score.
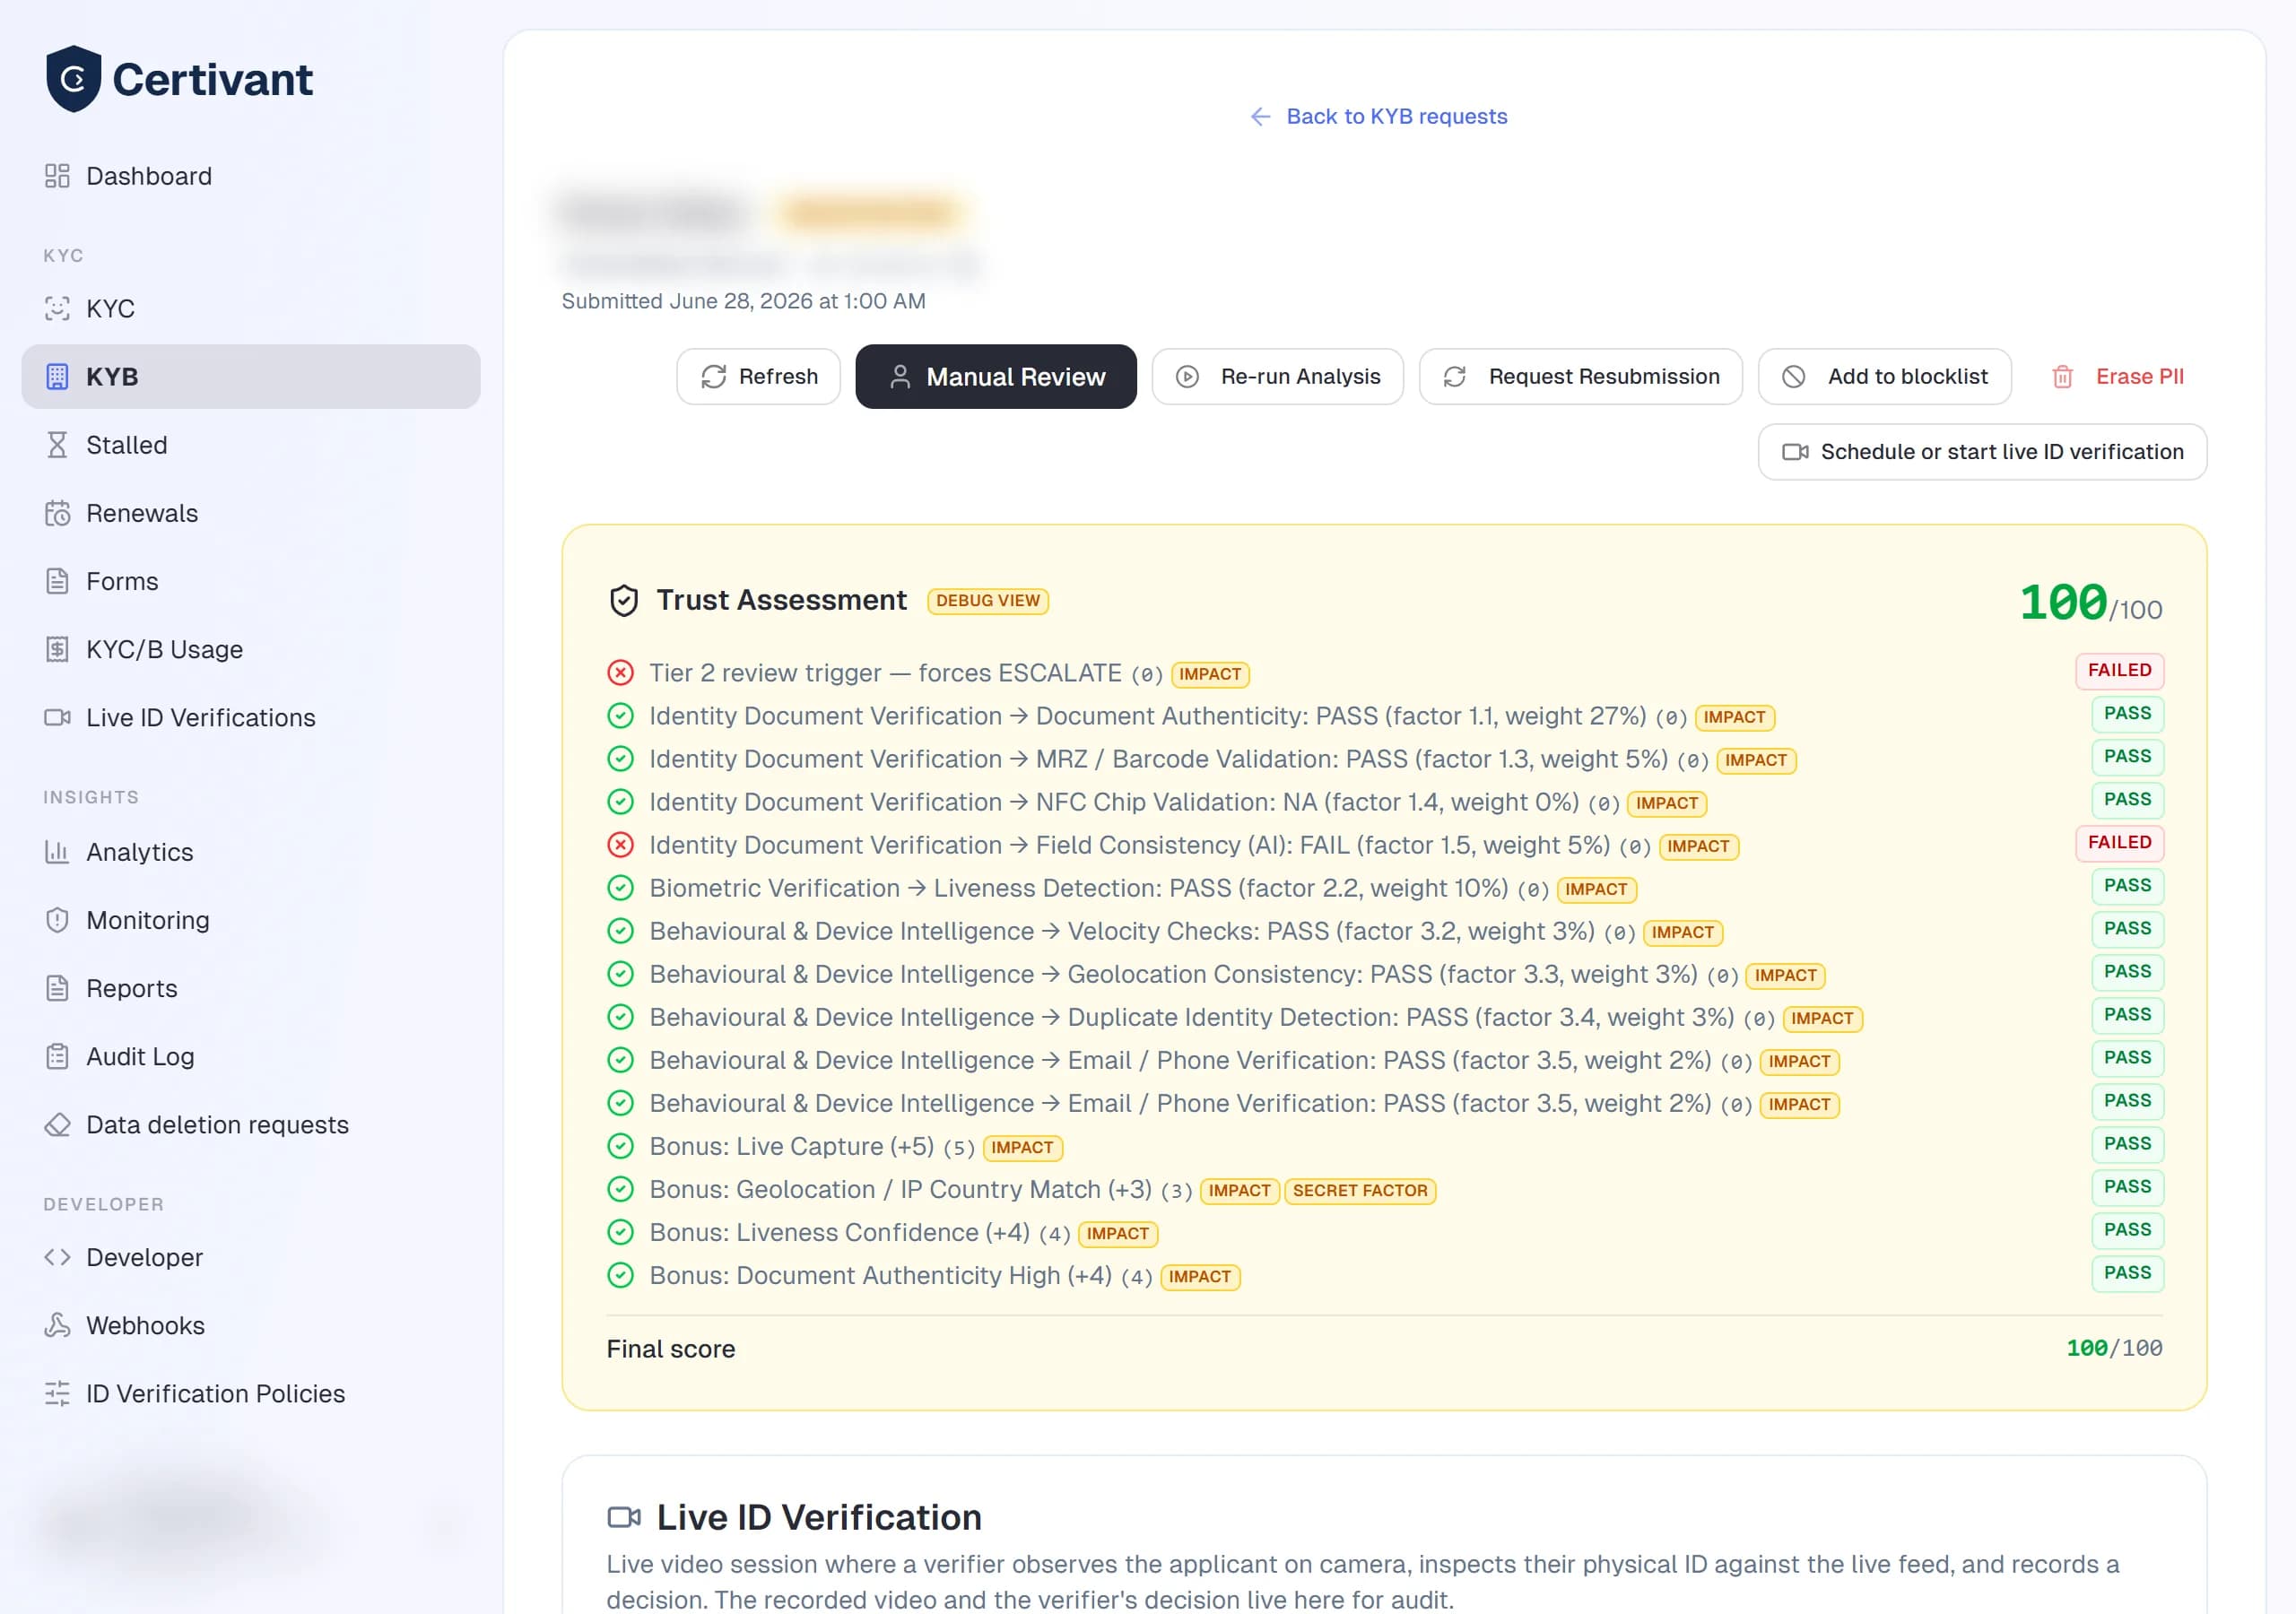
Every automated check we ran on the request — OCR consistency, face match (selfie vs ID), liveness, AI document-authenticity, sanctions / PEP screening, etc. Each check has a pass/fail or score and is linked to its underlying evidence.
Audit log tab
A tamper-evident history of every action taken on this request — who created it, when each check ran, every status change, every reviewer note. Used as compliance evidence in audits.
Download the Certificate of Verification
Once a request is APPROVED, a Download certificate button appears among the request's actions. It produces a signed Certificate of Verification (PDF) — a tamper-evident record that the identity was verified, including the verification date, the decision, and a unique certificate number with a public verification URL.
- The certificate is generated on first download and is idempotent — downloading again returns the same certificate, not a new one.
- The button only shows for approved requests; pending, rejected, escalated, or cancelled requests have nothing to certify.
- Any org member who can open the request can download it. Hand it to auditors, regulators, or your end customer as proof the check was completed.
Overriding an automated decision
If the system auto-rejected a request but you have context that contradicts the decision (you know the applicant personally, you have additional documents off-platform), you can manually approve:
Open the request detail.
Click Approve. The dialog asks for a review note — this is required, becomes part of the audit log, and is visible to anyone who later reviews the case.
Confirm. The status flips to APPROVED, the audit log records the override, and any downstream webhook fires.
The same flow works for rejections and escalations. Manual decisions are flagged in usage reports separately from auto decisions so you can track your manual-review burden over time.
Resubmissions
When a document is poor quality or has the wrong info, send a resubmission request instead of rejecting outright. From the document tile, click Request resubmission. The applicant gets an email with a one-time link to upload a new version of that specific document. The request stays in PROCESSING until they respond.
Troubleshooting
A request is stuck in PROCESSING
Most checks complete in under a minute. If a request is stuck for more than an hour:
- Check Settings → KYC/B that all the providers (OCR, biometric, sanctions, AI) are enabled and configured.
- Open the request detail and look at the Checks tab — one of them may be failing silently.
- A super admin can re-run individual checks from the detail menu.
A request shows "Overdue Reviews"
This means the request was escalated for manual review and the SLA window (set under Settings → KYC/B → Manual Review SLA) has elapsed. It's a nudge, not a hard block — just open the request and decide.
"Needs Review" stays empty even when I expect items
You're seeing it through your data-isolation scope. As a member, you only see requests assigned to you. Ask an admin to add you as a secondary manager on the request, or filter to "All teams" if you're an admin.
Related
- Send a verification request
- Invite teammates — so you can pre-assign managers.
- Billing & credits — each completed verification is billable.
Send a verification request
Invite an applicant to complete KYC or KYB verification by email — pick a form template, pre-attest verified channels, assign managers, and track status through to a decision.
Fraud Signals and Face Matching
What the fraud signals on a Certivant KYC/KYB request mean — including face matching, which detects the same face used under another name or date of birth across every organization on Certivant without showing you anything about the other organization.